Clio Settings: Connecting to QuickBooks
Not connecting Clio to QuickBooks is one of the mystifying trends we find when working with a new client using Clio or when working with a bookkeeper or an accountant in our Accountants Law Lab group. What is "why" behind why people choose not to connect Clio and has it remained a standalone product?
- There's a fear that connecting Clio to QuickBooks will drive in data that's unwanted.
- Clients like to keep Clio separate because they don't understand how the settings work.
- The setting to connect Clio to QuickBooks and synchronize is a bit hidden, and we find many of the attorneys users don't even know that this is a setting you can choose.
- Duplicate entries are created in Clio when it connects to QuickBooks
Now, rest assured, I will walk you through the settings. There's no need to fear this, as you want to connect Clio to QuickBooks to have the data flow into the accounting software so that you don't have to do manual labor entering invoices or replicating data.
No more manual entries
When you have the settings turned on, invoices push into QuickBooks perfectly. There will be no need to be posting income as a journal entry. There will be no need to re-enter invoices manually. The main reason you want to connect Clio to QuickBooks is that you want to have a true three-way bank reconciliation capability. The connection will synchronize the data, and then the bank feeds will validate the data. It's as simple as that.
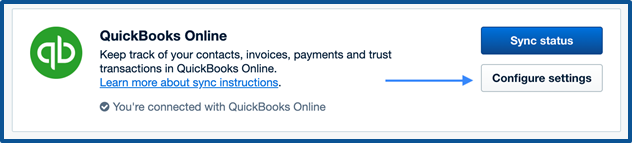
Where is the synchronize button?
As I mentioned earlier, it's a bit hidden. You have to go to settings, and then you go to sync. Once you open up this area, you will be looking at quite a few places where you will map accounts to Clio from your QuickBooks chart of accounts. You want to ensure that you have this correctly set up as you don't want to make any mistakes and push the data across.
- Go to the left navigation bar
- Two-thirds of the way down, see this settings tab
- Click the settings gear
- Go to bill syncing

Quickbooks Online Advanced
You should be using QuickBooks Online Advanced (my best pricing discount is included in this link) if you are an attorney working in QuickBooks. There are a lot of workflows and automation built into the product, and you get the backup service included in the pricing. You want to make sure you have set up the backup feature to run automatically to safely and securely back up your QuickBooks data.
Turn on the Online Back-up & Restore app for your QuickBooks Online Advanced data
QuickBooks automatically backs up your data when you turn on the Online Back-up & Restore app. Once it’s complete, it’ll track any changes made to your company data. Then you can restore a backup at any point in time.
- Go to Settings ⚙.
- Select Back up company.
- Note: You might need to sign in with Intuit, then select Authorize to proceed.
Note: See this page to view what you can and cannot back up on QuickBooks Online Advanced
If you do have a failure in synchronizing data, you can restore your data to the point it was before you made the connection.
Password protect the Quickbooks side
Before connecting to your QuickBooks file, the next step is to password-protect any prior area of data where you want to preserve it.
For example, if you're considering connecting the software today at the very end of May, you might want to protect the data back to December 31 and then import all the invoices for the fiscal year 2022.
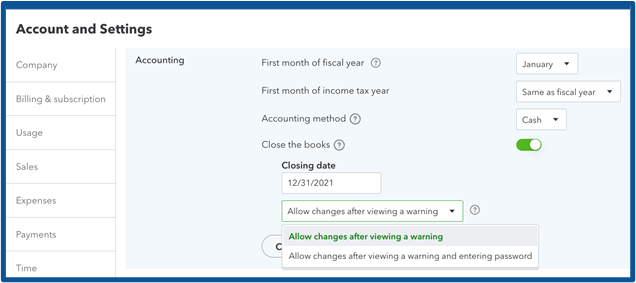
It's as easy as going into QuickBooks, going to the gear, going into your advanced settings, and in the very top section, you can set a closing date password. Setting a closing date password will stop any app synchronization from penetrating that barrier that you put in, which is shown in this example before 12/31/21. Think of this action as putting a wall between the software and the data push.
Settings
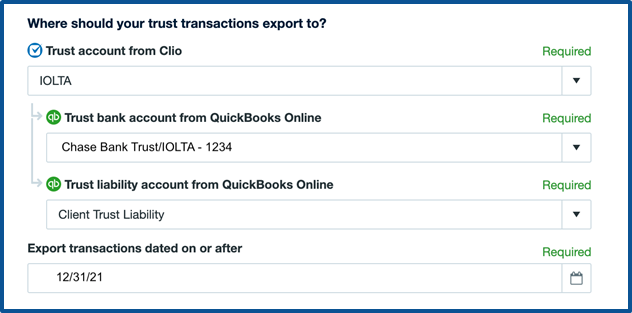
The next step is the settings. You want to be sure that you connect the correct bank accounts and the hard cost accounts or advance client costs. The picture below shows the proper settings for setting up Clio to have a good synchronization with QuickBooks.

Duplicate entries
Clio has a one-way sync. Because of this programming, if you're the bookkeeper working inside of QuickBooks and the attorney changes something on an invoice or something at payment on the Clio side, Clio will think it's a new entry and send over a second entry to QuickBooks. You have to be mindful of this action. Duplicate entries are something we see all the time. When you see the duplicated entry, it's typically the one you want to use as it is the corrected entry, and you want to remove the original. Staying on top of that each month will set you up for success. If you have to return in time that's reconciled, you will have to force reconcile the new transaction.
You must stay on top of any extra entries that sit in undeposited funds or inside the check register that will never clear the bank. Working with Clio is that you need to keep a close eye on hanging entries. It would help if you did this with all legal software as part of your compliance work.
Extra steps: our preferred workflow
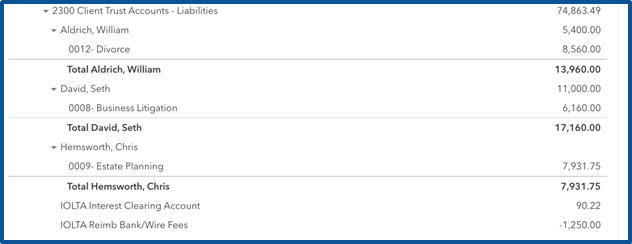
We prefer the complete transparent view of the trust ledger by pushing the data from the parent trust liability account into sub-trust liability accounts on the QuickBooks side. It's the best way to have perfectly compliant books on the QuickBooks and Clio sides. We recommend using the reclass tool for this extra step.
Can you skip this step and just sort by the customer’s name? Yes, but that method is very cumbersome and can become unruly. This way you can maintain them and close them out properly.
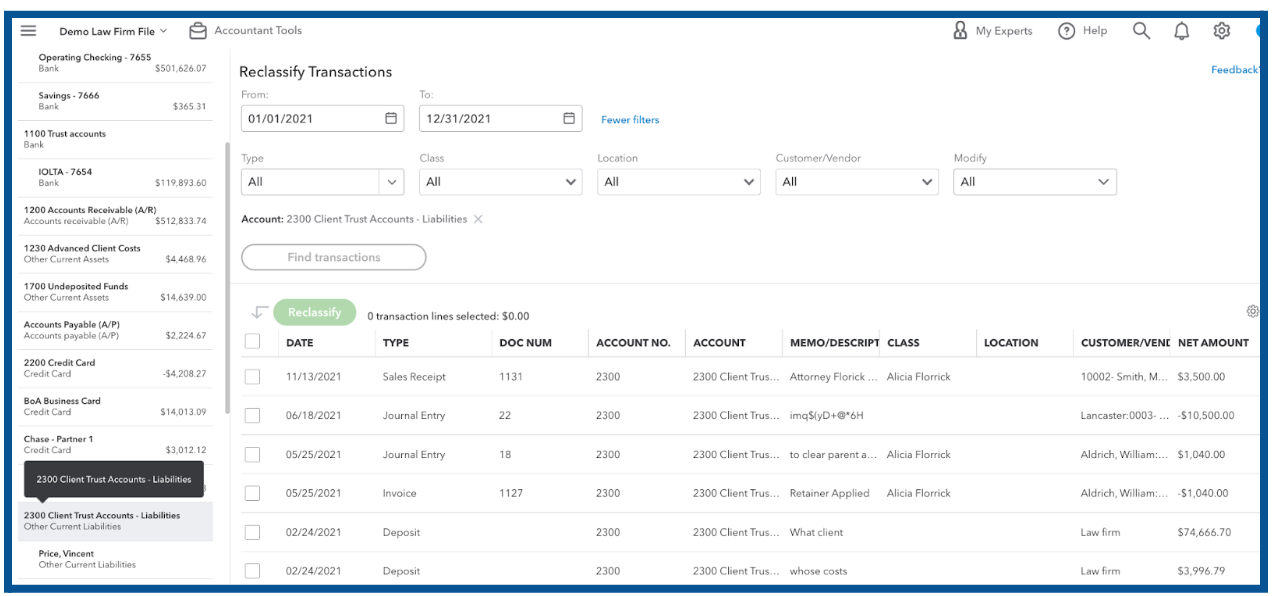
You can see below how we perform this action. However, it's as simple as clicking on your accounting briefcase in QuickBooks:
- Select the re-class tool
- Select balance sheet
- Select your date range
- Find the trust liability header or parent account
- Reclass all of those individual transactions sitting in the header into sub-ledger accounts. You will most likely have to create the sub-liability accounts as you push them out of the header and into their own account.
Reclass tool
That's it on the article on connecting and synchronizing Clio to QuickBooks. Once you have backed up the program and that password in place, you're ready to join the two software and let it do its thing.
After the synchronization is complete, you will be able to have all of those invoices that you process monthly in Clio pushed over to QuickBooks. All of the payments will push over as well. Remember Clio uses a journal entry for part of the transactional workflow for the Trust side.
The final step in the synchronization is to check the sync failures under settings to see what did not map over. 99% of the failures that we see are caused by the attorneys creating long matter names, and there is a cap on the number of characters allowed inside QuickBooks. If you find that some of the transactions did not synchronize over, you'll have to put them in manually. I suggest you check that sync failure page monthly.
Next week will talk about managing all of this in the bank feed.
I hope this article is helpful and you're able to connect the software and not miss out on the power of this integration. If this seems daunting, reach out to us as we are Clio certified at our firm. If you're a bookkeeper or an accountant, you can also join us at the Accountant's Law Lab to learn more about legal bookkeeping.
QuickBooks Online for Attorneys

Are you an attorney and want to use QuickBooks for your accounting software but don’t know where to start? Download this free e-book today!
Download E-book
We have a course! Fast Track Legal Accounting!

Are you an accountant or bookkeeper that just landed your first attorney-client and needs to know where to start? Do you have a few but want to serve them better? We have a course to get you started!
Learn More
