QuickBooks Online for Attorneys: Processing the Transactions
We are continuing on the series of QuickBooks Online for Attorneys, and after much hard work, we've finally arrived at a place where I think you are ready to get your hands dirty with starting to do some transactional work. By now you should have set up your file perfectly. If you haven't done that, make sure that you go back to this post to start at the beginning.
For the beginner QuickBooks Online user
The two main points you need to know about working with QuickBooks are the "+ new" and the "gear" are your navigation tools. Pretty much anything you need to know inside of QuickBooks is in these two places.
- For any transactional entries, you need to enter, go to that +New button.
- For anything that is a setting change, go to the gear on the top right corner.
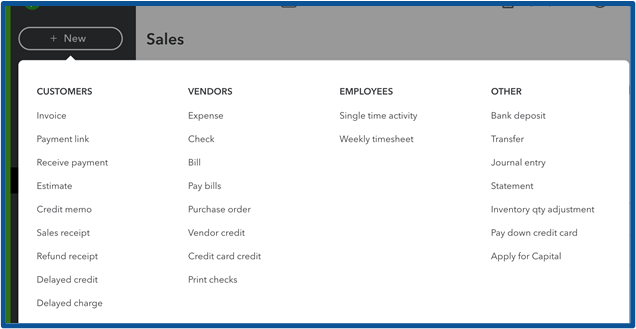
Client invoicing
For example, if you want to enter an invoice, you can click the “+ new” and add an invoice directly or you can click sales on the left navigation bar which will open up the sales section. There is also a home page screen, where you can click to get to customer transactions too. Lots of ways in QuickBooks to access the same section. Once inside the sales section, you can click on your client it will show a big green button on the right side where you can enter the transaction right from the client screen for that specific client. I find that to be the easiest when you first learn QuickBooks to go to the client's space directly.
Accessing the vendor section is exactly the same. I will not touch upon payroll in this article as that can be an article all by itself. I will say that I like to use QuickBooks Online payroll, but there are many other outside options available too. Here's an article where I speak specifically to attorney payroll.
Banking
One of the most favorite parts of QuickBooks Online is the banking feature. You want to first connect the bank feed, which is a simple task of finding banking from the left navigation bar and clicking connect to use your bank login to make the connection. Be sure to carefully select the dates you want to import.
If you started your historical records rebuild on January 1st, you want to be sure not to import the transactions back in the prior year. The other area of concern is when you initially connect the bank feed, QuickBooks will enter a transaction for the opening balance and reconcile it for you. If you used the tax return for your opening entry (I recommended that in an earlier post), this automatic transaction is unnecessary and will cause your bank account to be overstated. This opening balance transaction that was reconciled must be deleted.
Why connect the bank feed to the books? Connecting the bank feed is essential for making sure that your records are accurate. A critical point here, you still have to reconcile monthly. I have had clients come to me and think that because they connected to the bank, they don't need to reconcile. That is 100% inaccurate. It would be best to verify bank accuracy, especially for attorneys who live in a compliance world. Reconciliation is critical. Using the bank feed connection makes bank reconciliation much quicker and easier for you.
Retainers
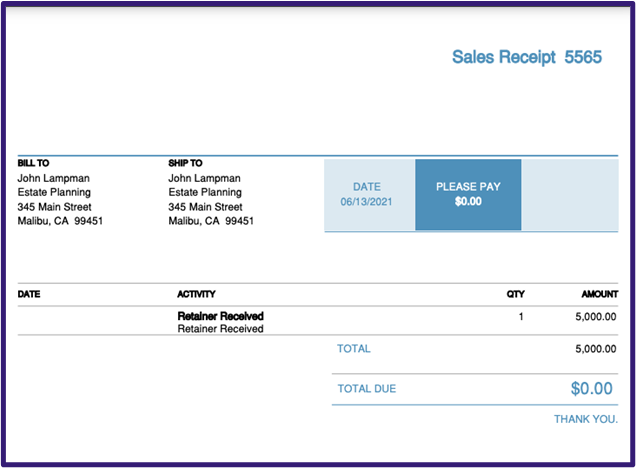
When it comes to accounting for the receipt of the client retainer, you might think it is basically +, bank deposit, and you can enter your retainer there to the client sub-ledger.
Well, that can work. Let me tell you why I don't recommend it. You want to use the functionality of QuickBooks Online and create a sales receipt and make this an accounts receivable transaction so that it is tracked in the client area. If you do the bank deposit method, you won't see those transactions recorded under the client's account, even if you add that client name to the transaction. This is where we use that "item" we set up called "retainer received". The final step is you will need to make a journal entry to move it into the individual client sub-ledger.
Time Tracking
Client fees


For client fees, they fall into two categories, "Direct and Indirect", sometimes also called hard and soft costs. The hard cost would be entered by using the item in a bill or a check type transaction. The place to do that is hidden when you go to the + New "enter a bill." You have to hit that drop-down arrow to have it show so you can use the item. Using advanced client cost item will help you to point that transaction to the advance client cost account. You have to add the client name to the account so that it is tracked in the client space/account. Additionally, this billable feature is also not on by default and you will have to navigate to settings and turn it on under expenses.
Make sure you click billable so the fee will be tracked to the client and have it available to add to your invoice when you bill out for your attorney time.
Indirect costs are handled a little bit differently because these are fees that are overhead for your firm that you are using for your client, and you are recapturing these expenses as billable income. A few examples of that are copying or postage. You can use postage for the firm, but sometimes you use those stamps to mail out to the client. This would be considered a soft cost that is invoiced back for expense reimbursement. Again, this is where those items you set up earlier are going to come into place. Remember, this recapture will create a contra expense and will show on the books as billable expense income.
In the video below, I demonstrate most of the transactional processes outlined above.
I hope you enjoyed our article discussing how to enter attorney types of transactions into QuickBooks. I also hope this article will help you by providing you with some tips on keeping your trust account in order, your invoicing is appropriately processed, and your client fees all inside of QuickBooks Online. Thank you for reading, and I hope this information can help you be more efficient with your business!
QuickBooks Online for Attorneys

Are you an attorney and want to use QuickBooks for your accounting software but don’t know where to start? Download this free e-book today!
Download E-book
We have a course! Fast Track Legal Accounting!

Are you an accountant or bookkeeper that just landed your first attorney-client and needs to know where to start? Do you have a few but want to serve them better? We have a course to get you started!
Learn More
